You don’t notice it happening. One day you’re sitting at your desk, focused on a deadline, and your shoulders are somewhere near your ears. Your chin is jutting forward toward the screen. Your lower back has abandoned its natural curve entirely. You’ve been in this position for three hours.
Bad posture isn’t a character flaw. It’s a design problem. Modern life — screens, chairs, cars, couches — systematically pulls your body out of alignment, one hour at a time. The good news is that what modern life has broken, a simple self-assessment can reveal. And what you can see, you can fix.
This guide gives you a 10-minute posture audit you can do today, plus a clear path forward for each problem you find.
Why Posture Matters More Than You Think
Most people associate bad posture with aesthetics — slouching looks lazy, standing tall looks confident. But posture is far more than cosmetic. It’s a functional health issue with consequences that compound over years.
Poor posture affects:
- Breathing capacity. A forward-rounded upper back compresses your lung volume by up to 30%. You’re breathing shallowly without knowing it, which elevates cortisol and reduces cognitive performance.
- Nervous system function. Forward head posture puts up to 60 pounds of effective pressure on your cervical spine. This creates chronic low-grade tension that keeps your nervous system in a mild stress state.
- Pain and injury risk. Most chronic neck pain, upper back pain, and tension headaches trace back to postural imbalances — not acute injuries.
- Energy levels. Holding a misaligned body upright requires constant muscular effort. You’re spending energy just sitting still.
- Longevity. Research consistently links hyperkyphosis (excessive upper back rounding) in older adults with higher mortality risk, reduced lung function, and increased fall risk.
The irony is that posture problems are largely invisible until they become painful. By the time you feel the headache or the lower back ache, the underlying imbalance has been building for months or years.
This is why a regular posture audit matters – not to look better, but to catch problems before they become structural.
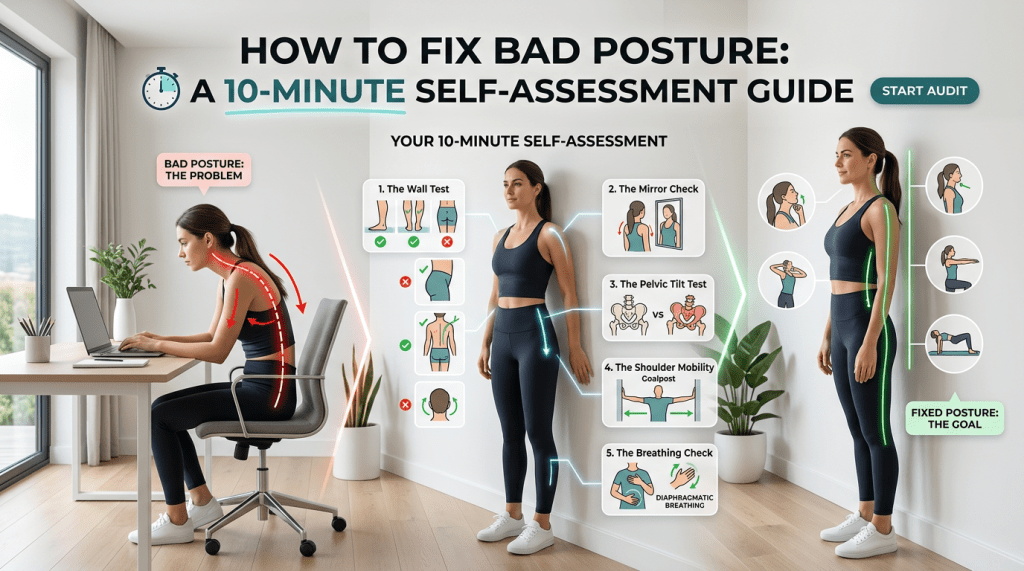
Before You Start: What You Need
The assessment requires:
- A wall
- A mirror (or a phone propped up to record yourself)
- A friend (optional but helpful for the side-view tests)
- Ten minutes of honest attention
No equipment. No gym. No specialist appointment. Just you, a wall, and the willingness to look at your body clearly.
Work through the five assessments in order. For each one, note what you find. At the end, you’ll have a clear picture of your postural profile and a specific action plan.
The 5-Part Posture Self-Assessment
Assessment 1: The Wall Test (2 Minutes)
What it reveals: Overall spinal alignment and whether your natural standing posture is within a healthy range.
How to do it:
Stand with your back against a flat wall. Place your heels about two to three inches from the baseboard. Let your arms hang naturally at your sides.
Now check five contact points:
- Heels — touching the wall or within two inches.
- Calves — lightly touching.
- Glutes — touching the wall.
- Upper back / shoulder blades — touching the wall.
- Back of head — touching the wall naturally, without tucking your chin or straining your neck.
What the results mean:
- All five points touch comfortably: Your standing posture is reasonably well-aligned. Move to the next assessment.
- Head doesn’t reach the wall without strain: You have forward head posture — one of the most common consequences of screen use. Your ears are sitting ahead of your shoulders rather than directly above them.
- Significant gap between lower back and wall (more than two finger-widths): You have excessive lumbar lordosis — an exaggerated lower back curve, often associated with anterior pelvic tilt and tight hip flexors.
- Upper back barely touches or rounds away from wall: You have hyperkyphosis — excessive thoracic rounding, the classic “desk hunch.”
- Shoulders don’t reach the wall: Your chest muscles are shortened and your shoulder girdle is pulled forward.
Note what you find. You’ll likely identify one or two primary patterns. Most desk workers present with forward head posture combined with thoracic rounding — these two almost always appear together.
Assessment 2: The Mirror Check (2 Minutes)
What it reveals: Left-right asymmetries and shoulder imbalances that the wall test doesn’t capture.
How to do it:
Stand naturally in front of a mirror — don’t try to “fix” your posture first. You want your default, unguarded stance.
Check the following:
From the front:
- Are your shoulders level, or is one noticeably higher than the other?
- Are your hips level, or does one hip appear higher or more prominent?
- Do your feet point straight ahead, or do one or both turn outward (duck feet) or inward (pigeon-toed)?
- Does your head tilt to one side?
From the side (use a phone propped up or ask a friend):
- Where are your ears relative to your shoulders? Ears should sit directly above the shoulder joint. If your ears are forward of your shoulders, you have forward head posture.
- Is your upper back flat, gently curved, or significantly rounded?
- Does your belly push forward with an exaggerated lower back arch, or does your pelvis tuck under (flat back)?
What the results mean:
- One shoulder higher than the other: Often indicates a dominant-side pattern from repetitive use — common in people who use a mouse heavily with one hand, or who carry a bag on one shoulder.
- Hips uneven: May indicate a leg length discrepancy or, more commonly, a habitual weight-shifting pattern from prolonged sitting.
- Feet turned outward: Often associated with tight external hip rotators and weak glutes — a pattern that creates downstream issues at the knee and lower back.
- Significant forward head: For every inch your head moves forward from neutral, the effective weight on your cervical spine roughly doubles. Three inches forward means your neck is managing the equivalent of a 42-pound head instead of a 12-pound one.
Assessment 3: The Pelvic Tilt Test (2 Minutes)
What it reveals: Whether your pelvis is in neutral alignment, anteriorly tilted (tipped forward), or posteriorly tilted (tucked under). Pelvic alignment is the foundation of spinal posture — everything above it is downstream.
How to do it:
Stand naturally and place one hand on your lower abdomen and the other on your lower back. Feel the orientation of your pelvis.
Now deliberately move through both extremes:
- Anterior tilt: Arch your lower back, push your belly forward and your tailbone back (like a duck).
- Posterior tilt: Flatten your lower back, tuck your tailbone under (like a dog with its tail between its legs).
- Neutral: Find the midpoint between these two extremes — a gentle, natural lumbar curve.
Ask yourself: Where does your default posture sit?
A simpler test: Look at your belt line from the side in a mirror. If your belt slopes downward at the front (front of pelvis lower than back), you have anterior pelvic tilt. If it slopes upward at the front, you have posterior tilt. Ideally, it’s roughly horizontal.
What the results mean:
- Anterior pelvic tilt (most common in desk workers): Associated with tight hip flexors (from prolonged sitting), weak glutes, tight lower back extensors, and weak deep abdominals. This pattern compresses the lumbar spine and often causes lower back pain.
- Posterior pelvic tilt (common in people who sit with a slumped lower back): Associated with tight hamstrings, weak hip flexors, and a flattened lumbar curve. Creates a different set of lower back and hip problems.
- Neutral: Your pelvis is well-positioned. Focus your attention on the patterns found in the other assessments.
Assessment 4: The Shoulder Mobility Screen (2 Minutes)
What it reveals: Whether your chest and anterior shoulder muscles are shortened — a key driver of the rounded-shoulder posture pattern.
How to do it:
Test 1 — The Wall Angel:
Stand with your back against a wall (same position as Assessment 1). Raise your arms to a “goalpost” position — elbows at shoulder height, bent to 90 degrees, backs of hands against the wall.
Slowly slide your arms up the wall as if making a snow angel, trying to keep your entire arm — wrists, elbows, and shoulders — in contact with the wall throughout the movement.
Test 2 — The Doorframe Test:
Place both forearms on a door frame in the goalpost position. Gently lean your chest forward through the frame. Note how much stretch you feel in your chest and front shoulders.
What the results mean:
- Can’t keep arms against the wall during the wall angel: Your chest (pectoralis minor), anterior deltoids, or lats are shortened. Your shoulders are being pulled forward by chronically tight anterior muscles.
- Intense stretch in the doorframe test with minimal movement: Significant anterior shoulder tightness. This is the muscle pattern responsible for the “shoulders-curled-inward” appearance and the upper back rounding it creates.
- Movement is smooth and unrestricted: Your shoulder mobility is good. The rounding observed in earlier tests may be more habitual than structural.
Assessment 5: The Breathing Check (2 Minutes)
What it reveals: Whether your posture is affecting your respiratory mechanics — a connection most people completely overlook.
How to do it:
Sit in your normal working posture — the position you default to at your desk. Don’t adjust it. Place one hand on your chest and one on your belly.
Take five natural breaths.
Observe: Which hand moves more? Which moves first?
Then deliberately slouch — round your upper back, drop your chin toward your chest. Take three breaths. Notice how it feels.
Then sit upright — stack your spine, relax your shoulders, lift your sternum slightly. Take three breaths. Notice the difference.
What the results mean:
- Chest rises more than belly: You’re breathing primarily into your upper chest — a shallow breathing pattern associated with elevated stress hormones and reduced oxygen efficiency.
- Significant difference between slouched and upright breathing: Your posture is directly limiting your respiratory capacity. Every hour you spend in a collapsed posture is an hour of suboptimal oxygenation and elevated physiological stress.
- Belly expands before chest in normal sitting: Your diaphragm is functioning well and your posture isn’t critically compromising your breathing mechanics.
Your Postural Profile: What to Do Next
By now you have a clear picture of your postural patterns. Most desk workers will identify a combination of:
- Forward head posture (from Assessment 1 and 2)
- Thoracic rounding (from Assessments 1, 2, and 4)
- Anterior pelvic tilt (from Assessment 3)
- Shortened anterior shoulders (from Assessment 4)
These four patterns form a cluster — they reinforce each other and all stem from the same root cause: too many hours in a flexed, seated position.
The fix isn’t complicated, but it requires consistency. Here’s where to start:
For forward head posture: Chin tucks (10 reps, three times daily) and cervical retraction exercises. Raise your monitor to eye level. Stop looking down at your phone for extended periods.
For thoracic rounding: Thoracic extensions over a foam roller or chair back. Wall angels as both assessment and exercise. Open-book rotations.
For anterior pelvic tilt: Hip flexor stretching (couch stretch, kneeling lunge stretch). Glute activation work (bridges, clamshells). Dead bugs for deep core engagement.
For shortened anterior shoulders: Doorframe chest stretches held for 60–90 seconds. Band pull-aparts. Face pulls if you have access to a cable machine or resistance band.
For breathing: Practice diaphragmatic breathing for five minutes daily. Perform this in a supported upright position so you’re retraining both the breath pattern and the postural habit simultaneously.
The 10-Minute Weekly Practice
Run this assessment once a week — same time, same location. Track what you notice. Posture changes slowly, but it does change. Within four to eight weeks of consistent corrective work, most people notice measurable improvement in their wall test results, reduced tension headaches, and a natural tendency to sit taller without thinking about it.
The goal isn’t perfect posture. Perfect posture doesn’t exist — your best posture is your next posture, meaning frequent position changes matter more than any single “correct” position.
The goal is postural awareness — the ability to notice when you’ve drifted into a damaging pattern and return to alignment without it becoming a full-time obsession.
Your body has been shaped by thousands of hours of modern life. Ten minutes a week is how you start shaping it back.
Related Reading
If this post resonated, these earlier articles explore the connected ideas around longevity, movement, and the physical cost of desk-based modern life:
- The Hidden Injuries of Sitting All Day (and How to Fix Them Early)
- Digital Posture: How Screens Reshape Your Body (and How to Fix It Fast)
- Posture, Breath, and Walking: Three Simple Habits That Improve Health and Longevity
- How Desk Work Affects Your Nervous System: The Physical Cost of Focus
- Designing a Body That Tolerates Modern Life: How to Stay Healthy in a Sedentary, Screen-Based World
- Movement Snacks: How to Stay Active Without “Working Out”
- Daily Mobility for Joint Health: Small Movements That Pay Off for Decades
- How to Improve Flexibility and Mobility: Daily Stretches to Reverse Years of Sitting


Leave a Reply